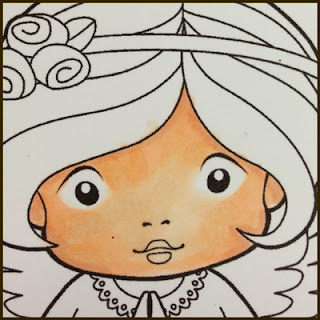
These are the colors I am using for the skin- E000, E00, E02 & E11. To Start, I cover the whole face with E000. This first layer may be streaky or uneven- it will get covered. I try to leave a blank area around the eyes.
The next step is to add a line of the E00 around the hairline, ears and cheeks. basically any where there would be a shadow or where the edge of the face recedes. Anything that is further away should be a bit darker than what is closer to the viewer. I then go over the lines of E00 with E000 with a "flicking" motion toward the center. (Trying had to avoid the eye area I left blank.)
I then basically do the same process with the E02 of shading around the edge of the face the blending toward the center. First with the E00, Then the E000. The skin will start to get a gradient or I guess ombre effect that gives a more rounded appearance.
And this is the last of the flesh color pens added in the same way, E11. Which is then blended out with the E02, Then and E00 and finally a last blend out with the E000. This last blend is where I try to get the skin even and well blended.
This is where I would add blush or lip color. I used R20 here. (ou will see it better on hair pictures.) and blend it with E000 to soften.
This is also a good point to do any clean up with the blender pen. If there are any stray marks in the eye area or hair they an be gently lightened with the blender.
Now on to the hair!
I choose A blending set in the E20 range. The lightest and darkest tones will be used sparingly so focus on middle shades when picking a color. I wanted to do a mid range brown with a golden sheen to it.
I start with the second darkest coloe In this case I am starting with the E27. I color the roots or part of the hair this color. I also color the tips of the hair and out side edges or shadows. Remember that we want to make the head appear rounded by having darker shades further away.
I then feather out the darker color with the next two colors (E25 then E23.) I blend in from the darker colors toward the middle where the highlight or lightest color will go. When I first stated (and sometimes still if I am being very exact) I will make a light curved mark with the lightest color to show where the highlight should be.
I now add the lightest color over pretty much all the hair to blend and soften any hard lines and add the highlight color. And now I move to the second "layer." of color.Starting at the part, tips and edge of head, again, I color in a small amount of the darkest color- E29. You want to use a really light hand and just to a bit to deepen the shading that we already put down with our first layer of color.
I then blend toward highlight from darkest to lightest like I did before. Adding E27 and E25.
And then E23. As you can see the highlight area is much smaller on this layer. But we only want a sliver of that bright sheen for it to look more natural or real. One of the best suggestions I read or heard when I was learning about Copics was to look at magazine photos. Ads (especially for make up or shampoo) will have girls with super shiny hair which is the look I am trying to duplicate. And I can look at how their hair is naturally shaded for guidance.
I add one more blending layer with the lightest shade (E21) and stop. I left some harder lines between some shades, you can take more time and blend it out softer. But basically this is my method for hair.I suggest you look at and try all the different techniques or methods out there. (There are so many tutorials!) And find a method for coloring and shading with Copics that feels right to you. Because there is no right way to color there is just fun. So go have some!!
Below are samples of some cards I made with Copic colored stamped/digi images. All images are the property of the artist/manufacturer please respect that!!
This is another La-La Land digi stamp by the wonderful Irina Blount. It is called "Best Friends Luka." I colored the hair a similar brown, but went a tad darker on the skin tone.
This card features a stamp by The Greeting Farm called "Cheeky Nurse." I used the same technique with a strawberry blonde coloring
These adorable dolls are made with the Julie Nutting/Prima stencils. While most of the image is done with paper piecing, the hair on all four were colored in Copics.
Coming soon - Part Two: Darker skin tones, and Curly hair techniques.


