Showing posts with label mini album. Show all posts

Friday, August 21, 2015

Win My Paper Gramophone & Mini Album at Custom Impressions' Scrap Pink Event!!


Starting NOW and running through Oct 17, 2015 you can buy a raffle ticket to win this hand crafted, paper Gramophone home decor piece with a matching mini album stored inside. The tickets are only $1 (what a bargain!) And can be purchased at Custom Impressions (3982 Cerritos Ave.Los Alamitos, Ca  90720) in person or by phone (562 430-8100).

The proceeds from the raffle will benefit the Breast Cancer Angels Charity. For more information about please visit their web site. http://www.breastcancerangels.org/

The Gramophone is made with Graphic 45's Curtain Call paper. And was designed using some 3D modeling techniques. It was designed for my 2015 audition for the Graphic 45 Design Team. (blog post here.)


I recently created the matching mini album to fit in the gramophone's drawer. I styled it after the vintage albums that held my grandpa's 78 speed records. Like the gramophone, the mini album features G45's Curtain Call line along side Paper Studio's Kraft Paper and Haberdashery lines. I love how these papers look together, such a pretty vintage style.

The album also has Kathy Orta King's Hidden Hinge binding system. (For more info please visit her Paper Phenomenon site.) This style of binding along with the large gusset spacing should allow space to add tons of photos or other memorabilia. There are lots of pockets and other interactive features on the album for all the memories you add, including six "record album" inserts.

The winner will be drawn during Custom Impressions' Scrap Pink Crop on October 17, 2015. So call and get your tickets in!! For more information shoot me an email or contact CI. Thanks!!


Thursday, August 21, 2014

My Version of the MDM using G45 Couture & Typography Goes to Moscow

Recently, I had a chance to make a gift for a friend of mine who lives in Moscow, Russia. Since she has never seen any of my paper crafting in person, I wanted to make something special. I decided to make a version of Kathy Orta's My Design Mini album and use Graphic 45's Couture and Typography lines.

 
I picked the MDM album because it has customizable options, but does not look too complex or overwhelming for someone who doesn't scrapbook. Also it was a new tutorial for me and looked like fun to make. Couture by G45 was my first thought for paper because my friend is stylish and the colors and feel of the paper suit her style. As I worked on the project and realized I need more pspers, I added the Typography line (also G45) into the mix.
 
I really like the My Design Mini and the idea of having a tutorial that can be customized to different projects. What a great concept! To get the MDM tutorial click here. To order the EKC #12 with MDM included click here.
 
Since I did not create the MDM design, I don' t feel right posting images of the book in progress. So we will skip right to dessert with pictures and a video link of the completed album.


Thursday, July 10, 2014

The Paper Phenomenon Files (Part 1) OR How I Learned to Embrace My Inner PITA and Became a Kathy Orta Fan.

A bunch of my friends were doing it but I wasn't sure it was for me. But the projects I saw were really cool and I I liked them . So eventually I decided I would try it too. And now I just can't stop. What am I talking about I'm talking about doing the Kathy Orta tutorials from paperphenomenon.com.

It started innocently enough. I decided to buy three tutorials on her website. The three I chose were the file m for memories, the vintage camera and the vintage typewriter. Now clearly I didn't choose the easy tutorials. I chose projects that were things that I wouldn't normally make. I wanted these to be projects where I learned something new. So I chose projects that were heavy on the construction which I hadn't done often.


First up with a vintage typewriter. The first step was to make sure I had all the materials and supplies I needed. After that I cut down all my chip board according to the instructions in Kathy's tutorial. And although there are a few moments where I struggled in the construction it wasn't very hard to follow the directions and put the typewriter together.


I did do one thing differently from the tutorial and added a small mini album to the inside of the typewriter instead of the calendar cards that were in the original tutorial. I used the Prima / Marion Smith Romance Novel paper for the mini album. It was based on a mini album in Kathy's Interactive Mini-Albums book. (I bought a digital copy from annies.com. It is aldo available signed on paperphenomenon.com)


I was really pretty thrilled with the end result. And was proud to give the typewriter and album to a friend of mine (who is a romance/ya writer) as a birthday gift. I also made another Vintage Typewriter for a friend as a graduation gift. (I used Graphic 45's  Bohemian Bazaar for the mini album.) I also put black painted grunge board over the "roller" of the typewriter on the second version, this gave it a very realistic look.


To make your own Vintage Typerwriter, you can buy the tutorial here at Kathy Orta's blog, paperphenomenon.com. And some of the hardware can also be purchased here at the blog shop. Many of the items are Tim Holtz items and can be purchased at craft stores. But getting them from Kathy can save time and having to buy extras. For the typewriter's keys, I bought laser cuts from PorkchopShow's Etsy store. (The black ones seem to fit better than the silver.)


The second project I chose to make was the File M for Memories album. One of the reasons I really like this album is that it is full of pockets.  I think that this makes the File M album a great gift for my non scrapbooking friends because they can use ot like a journal or diary. Notes, poems, drawings or just about anything can be tucked into the pockets with out having to add glues.


This level of complexity to the pages did make it a bit harder at first. In fact, I found this album harder to make than the typewriter. The trick for me was that I needed to see a page completed and understand how it worked. However, once I understood how the flaps and the pockets come together it was much easier to visualize and itn"clicked" for me. And then the process of construction for the rest of tne album went pretty fast. I was very lucky and met one of the women I crop with had made the album before and help me put together my first page.


I matted the album mainly with Kaisercraft's Telegraph Road but I also used some of their other lines like Kaleidoscope, BeYOUtiful and Storyteller because this album is pretty large and takes a lot of paper to decorate. I also used some of the Kaisercraft Captured Moments cards. (These are like Project Life or journaling cards.)  I think all the papers matched very nicely. I think sometimes when you use a group of papers all from the same company the colors and the themes can work well together. This project was also I gift, this time for a friend of mine who recently moved to China.


Some tips for making the album: Choose a file folder that has a nice large tab on it. I think this is a nice look for the album. (I decided not to use the printable templates in the tutorial.) Definitely make a template for matting the tabs (it should be slightly, 1/8 inch, smaller than the tab base.) That way it will look consistent, I did not do this and regretted it.


Another tip I learned that really helped was that adding a. thin layer of glue stick over the scor tape (or other double sided adhesive), gives an extra few seconds where you can move the item before it's fixed permanently.  This helped me a lot. I sometimes need a second chance, so this avoided alot of boo boos. In the tutorial Kathy used  Scotch wet glue to attach the pattern paper(snd it looked fab). I tried, but it didn't work as well for me(maybe I used too much adhesive). I then tried using a glue pen (Martha Stewart), but it seemed to stay a little too tacky even after it dried. I now use Scor Tape with the glue stick trick and it has been pretty successful.


To get the tutorial for the File M album at paperphenomenon.com go here. The main supplies you will need a chipboard cardstock and pattern paper. And since this is a nice big album you can use that whole line of pattern paper you have tucked away for just the right project.


The final project in my triptych of Kathy Orta projects is the Vintage Camera. This is the tutorial I was most intimidated by. Both because of the difficulty and the fact it was going to be a gift for my Dad and Stepmom. But this also made it the tutorial I looked forward to the most. And in the end had the biggest "pay off" for me.


I have to admit I did stray from the tutorial. The biggest change was using Kraft Tex instead of regular cardstock for the bellows.  For those of you who haven't used it, Kraft Tex is a paper/fabric hybrid. It is made from paper fiber, but has the strength, texture and durability of fabric. Heck you can even throw this stuff in your washer! So basically i followed the cutting, scoring and folding directions the same as Kathy gave for paper. The difference was that I had to score a little harder and use a strong wet adhesive. I used the brown Kraft Tex and painted it black with Tim Holtz' Distress Paint. I then distressed, sanded, repainted and distressed again until it had an antiqued leather look. It was a bit of work to get it just right, but it was SO worth it.


The second place I was forced to make changes was in the hardware. While most of the hardware is pretty easy to find, the Graphic 45 Staples Metal Tags are not. I was lucky and had a pack with all but one of the six tags. So i only had to replace one. (The "P" medallion at the front of camera base, under lens.) The metal piece that curves around the lens is sldo different. Instead of the clip for binding documents (which I could only find in a box of 100), I used a Tim Holtz metal word band and curved it gently with pliers.


I highly recommend that you have a really good trimmer that cuts medium to heavy weight chipboard before tackling this project. Some of the pieces are cut quite small and can be difficult without one.
Inside the camera is a really cute album. Since this was an anniversary gift, I used Teresa Collins' Save the Date (with a little You Are My Happy and Something Wonderful.) The angled pocket construction of the album is very striking and would look good as a stand alone piece.

 
I think the camera ended up being my favorite piece. I plan to make a couple more, including one for myself. The tutorial can be found here. It includes video for the bellows portion, so be prepared to play you tube on this one.


I hope you enjoyed this first foray into the Paper Phenomemon files of Kathy Orta. I really enjoy making these tutorials and plan on trying more. Let me know what you think. Have you done any of Kathy's projects? What are your favorites? Or is there a different paper craft
er's tutorials that you love?

Monday, September 9, 2013

Upcoming Class - Mini Album of Tricks & Treats Using Graphic 45's Sweet & Spooky Steampunk Spells!

Next month (October 8th from 6-9pm to be exact), I will be teaching a class (at Perfect Day Scrapbooking in Huntington Beach) of this super special mini album.  It uses Graphic 45's Steampunk Spells line and will be perfect for Halloween. And the beautiful paper is not the only treat that makes it special, no no no. This album includes some of the tricks & techniques I learned at Laura Denison's Graphic 45 class at CHA, Las Vegas, including her "stack the deck" binding. And at $28.00 the cost of the class may be the biggest treat of all!

Scroll down for more sneak peaks of the album and info on where, when and how.  Or if you are in the Soutern California area swing by Perfect Day (9552 Hamilton Avenue, Huntington Beach, California 92646 / 714-369-2862) and see the sample in person. 

 The stacked binding creates such a clean well hidden hinge for the pages.  And the hardback cover is also made "from scratch."

And the pages are so interactive! Tags that slide out of both the middle and the ends of the pages! And each page can be combined how *you* want it so it is totally personalized.

And don't let the folded and layered look fool you. The technique for making these pocket pages is really quite simple - Once you know how!

The images used for Steampunk Spells are really creative and manage to be both a little creepy and a little cute, sightly whimsical and a bit witty, bright and fun all the while still having that great vintage feel Graphic 45 is known for. I really love this line.

And even from the back this mini is fun and pretty with classic steampunk gears and roses. It would look great on display.

So, now you have had a peek inside this mini album full of tags, pockets and some new tricks and treats to learn. If you want to make one of your own, please contact Perfect Day Scrapbooking in Huntington Beach (9552 Hamilton Avenue, Huntington Beach, California 92646 / 714-369-2862) to reserve a spot!


Supplies needed - scissors, wet & drt adhesive of choice, scoreboard & tool, trimmer, ruler pop dots.
Optional - ink/chalk for edges

Sunday, August 11, 2013

A Horse of a Different Color: New Oz album with G45 "Magic of Oz" & Leaky Shed Chipboard!!

We are journeying over the rainbow once again for an album full of Graphic 45's Magic of Oz paper. One of my oldest friends loves the Wizard of Oz and I want to make a very special album as a gift.  This time I am altering a Leaky Shed Emerald City chip board album.  I ordered this album with some matching etched chipboard embellishments a while back (like a year ago);  I think Leaky Shed still makes it.  Ask your local store if they can order it because it is pretty darned cool.
I started by altering the pages of the ablum to be a little more unique and interactive by adding flaps. I then covered each page with the gorgeous G45 paper.  To do this I traced the shape of the chipboard onto the paper (doing it backwards on back of paper where possible)  And trimmed then sanded/filed away the overhang.
On the front cover is the green "Emerald City" paper.  This album  comes with doors , I covered them with "Parcel Post." 
I really wanted the doors to open and close, so  I used a set of Tim Holtz' Idea-ology hinges. The brads provided won't go through the thick chipboard, so I used 3 in 1 glue. (Let it sit overnight) I also added a latch.
For the chip board letters I painted them in a thick coat od Viva Decor crackle paint in gold.  When it was dry I buffed in some InkaGold in lime green.  The final embellishments added to the cover were some Jeweled brads (green of course) and some green rhinestones.
On the back of the front cover I used the "Munchkins" paper.  Using the text on the door and the munchkins on the rest of the page.  I also added a line of brass colored faux brads around the arch of the door.  On the next page, I lined up Dorothy and Scarecrow to the front door using a quadrant from the "There's No Place Like Home". The background is the bubbles from the "Poppy Fields" paper.
I covered the back of page two with the character side from the "Yellow Brick Road" paper .  At the bottom I added a "pocket" with a strip of card from the "Journey to Oz" 8x8 paper.  I added a couple of tags into the pocket, one curved with  the poppies from "Poppy Fields" and the "Emerald City paper on back with stamps from "Parcel Post" and a pointed one with gingham from "Yellow Brick Road" and the slippers side of the "No Place Like Home" paper.
Page three has a flap added to it, I covered the front side in the Oz lettering from the "Scatterbrained Scarecrow" paper.  I added a copper color die cut embellishment by leaky shed of the Scarecrow. (These also seem to be made to match the Magic of Oz.) The outside of the added flap and main page are cover with the hearts from "Tenderhearted Tin Man."  And have a silver Tin man embellishment by Leaky Shed and Cowardly Lion stamp.
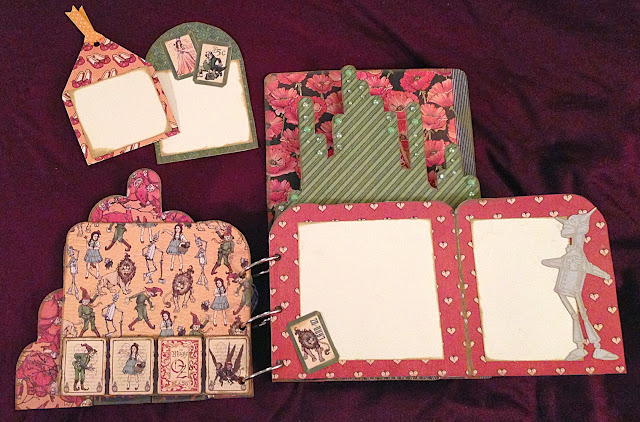
The back of the third page is covered with the ruby slippers pattern ("No Place like Home") and a fussy cut one from reverse side.  The next page is the tall silhouette of the Emerald City and the center of the book. I covered this in the green stripes from "Parcel Post." I added different sized green rhinestone bling on the top "pillars."  I used the same tracing, trimming and filing method that I used on the cover to get the shape right. I added two over lapping flaps.  The front one has the "Emerald City" paper with more green bling and a green pom pom ribbon across the bottom.
 The back of the flap is in the "Tenderhearted Tin Man."  The underneath flap has the newspaper side of the "Goblin Gazette" on one side and the cards from "Journey to Oz" on the back.
 The back of the city silhouette has the Oz lettering from the "Scatterbrained Scarecrow." There are some carer rhinestones added to the tops of the "pillars."  At the bottom I ,made a pocket from the "Munchkins" paper with a fussy cut edge at the top.  I added two tags that I had made for a different OZ album that didn't work out. (long story, lol)  So I honestly don't remember what the pink or gingham paper brands or lines are, I'm sorry.  On page six I added two flaps that I shaped into folder type tabs using the We R Memory Keepers envelope punch.  I added a simple woven ribbon tie to them. 
The base page is the blue gingham ("Yellow Brick Road") with a fussy cut Dorothy. The inner tab has hearts ("Tenderhearted Tin Man") and a fussy cut Tin Man on one side and "Yellow Brick Road" on the back. The front tab has the "Goblin Gazette" with a card from "Journey to Oz" on one side and the writing from "Munchkins" with a couple fussy cut munchkins on the other.
 The back of page six has the stamps from "Parcel Post" with the Leaky Shed Cowardly Lion embelly. The next page (7) has the striped side of "Parcel Post" covering it.  
 This is another page that has an added flap panel.  I covered the outside of the flap with the Scarecrow and Tin Man from the "There's No Place Like Home" paper.
 The inside of the flaps are in the "Emerald City" paper with a fussy cut Scarecrow and the words "There's no place like home" across it.  Page eight has cards from the 12x12 and 8x8 "Journey to Oz" paper.  I used one at the top of the page to change the shape of the page.
The back of page eight features the Wicked Witch.  I used the "Wicked" paper with fussy cut clocks from reverse as embellishments.   The next page is a pre-made chipboard tag I added to the album.  It has the Oz lettering from the "Goblin Gazette"  with the witch feet from "There's No Place Like home fussy cut on it.
The back of the tag has the "Tenderhearted" hearts and a fussy cut Wizard. I added some red and yellow ribbons.  I added a large page to the back so that the silhouette of the Emerald City was highlighted.  To create contrast I used the poppy paper over the whole piece and added the  Scroll work title from the "Magic of Oz" paper. 
 For the back of the album, I decided to go simple with a sheet of the Goblin Gazette.
I was really happy with how this min turned out and I think my friend really like receiving it as a gift.   The leaky shed album and embellishments were a great platform for the amazing Magic of Oz papers in 12x12 and 8x8 (one of my absolute faves!)

I apologize for the meh photos, I ended up taking them with my phone at my friends house.