Thursday, March 21, 2013

Two Carta Bella Mini Albums - Well Traveled & Traditions


These are two similar mini albums that I created with the idea of building a kit or a class.  I used the Carta Bella paper because I liked the vintage look and it came in full sets that I could play with.  I left the embellishments fairly simple.

I used alot of similar techniques and concepts on both albums.  The main difference is that while I used the Cricut and other machines for my techniques on the Well Traveled album, I just used my trimmer and score board on the Traditions album.  As you will see the same basic effect can be achieved.
Well Traveled Mini Album-
This album is sized at 6 x 8. For both the front and back cover I trimmed four inches off the bottom to make it 12 x 8. Then by scoring, folding and gluing it in half  it became a 6 x 8 cover.  (I always keep the trimmed parts to make into pockets or mini stacks in the album.  Once I had the cover made I took the letter stickers and heat embossed them with Stampendous Aged copper embossing powder.  To do this I presses each letter onto a Versamark (or other glue) pad and then into a small bowl of the powder.  I used tweezers to hold the letters and  my heat gun to melt the powder.  Some of the orginal color does show through, but I think this makes it look more vintage.  I added a little more interest by tracing over some of the lines on the paper with a copper colored pen and added one of the kit's stickers behind the text.
When you open the cover you can see all the layers and shaped edges I made with the Cricut.  I mainly used the Artiste and Mini Albums cartridges.  I welded the shapes together in Cricut Craft Room so they were the widths and heights that would create this layered effect.  Once I had the pieces cut out I scored them and folded them in half.
 After the first layered sections, there are two small file folders that were cut on the Cricut. For these I used plain colored cream and black cardstocks.  They are decorated with the Well Traveled alphabet stickers.  Behind the folders is another page that was trimmed and folded like the cover, but was not glued together, and a pocket was added to the inside.
The next set of pages were made with Core'dinations paper. I welded the pocket watch and gear shapes together in Cricut Craft Room and cut them on the sand-able paper. I then carefully scored the paper so it folded in half. I then used my big shot and largest embossing folder (it still had to go through twice) to emboss the pocket watch half.  Once it was embossed I sanded the paper to reveal the pattern.  Behind the pocket watch is a full page sized file folder cut on the Cricut. Inside the folder is a layered mini stack of paper.
On the inside back cover there is a small envelope cut by the Cricut on cream stock.  The back cover is trimmed folded and glued just like the front.  I really enjoyed making this album and figuring out some new (to me) techniques for making a mini book with the Cricut and some other tools.  When all the pages were folded and I decided on an order for binding, I punched each page seperately on the Cinch (including the smaller items like folders) and bound them with a 1 inch wire.

Traditions Mini Album-
This album is sized at 6 x 9. I used the same technique of folding the page in half I did on the Well Traveled book, but this time I only trimmed three inches off the bottom. On the front I added a title with the matching Carta Bella Traditions alphabet stickers.  In the upper left I added some Basic Grey rub on / bling that I thought worked well with the paper.  I also added some additional flower stickers from the kit.
When you open the book there is a small file folder made with a Basic Grey paper I thought would look good with the Traditions line.  To make the folder I traced a pattern on the edge to make the tab shape that sticks out (and reversed it on other side.) I then hand cut the design. I used my trimmer to keep the edges as even as possible and rounded the corners with a corner punch.  I may not be perfectly symmetrical or lined up on edge. But I like the charm of seeing a bit of the dark red peek through. 
To try and capture a layered look on the first album I cut a single sheet to be about 3.5 x 9 and rounded the non bound edges with my punch.  I then cut about an inch off one end of the folded pages behind it and rounded the corners.  Cutting one side of the folded page shorter reveals the back side of the pattern paper.  This technique could create many more layers.  I added another of the Basic Grey rub on/bling to the yellow page.
I also added mini envelopes. Only this time I made them with my scoreboard (I use the Martha Stewart one) and the envelope attachment.  To add interest, I left one of the sides open instead of the top (or usual side.)  This made a tall thin envelope which I think layers well with the smaller traditional shaped envelope.
 This is a second section of the Traditions album where I created a layered effect. Here I used the 6x6 pad and trimmed three sheets progressively smaller.  I like how the six inch height centers on the page behind it.  This technique looks nice as you flip the pages too.
On the back cover I added a layered mini stack using Bo Bunny Dot paper and some of the new Splash of Color paper.  This time i used brads to attach the stack.  After I had all my pieces I played around with order until I was happy and bound it with the Cinch

I am really glad I gave myself this "challenge."  Its nice to know that I can still enjoy making something pretty with out power or special tools. Al though I think I will hold on to my tools for now.

Materials used:
Cricut Cartridges: Artiste, Mini Albums
Papers:Carta Bella Well Traveled & Traditions, Bo Bunny double dots, Splash of Color, Basic Grey
Inks/Glitters/Paints: Colorbox creamy brown chalk for edging
Other: Basic Grey rub-on/bling

G45's Bird Song- An Altered Cigar Box

When Graphic 45's Bird Song collection was released, my boyfriend and I fell in love with it and wanted to use it to wallpaper our apartment.  This seemed like it might be both impractical and could possibly break our lease. So when I found cigar boxes for sale, I decided making an decorative altered box with Bird Song would be perfect.


 I started by measuring all the panels of the box, inside and out.I then made a simple diagram with the measurements to have a reference to follow. Having this information let me try to cut the paper so that it flowed smoothly from one panel to the next. When I started the box, one of my first steps was sealing it with decoupage medium. I used a quick speed decoupage and at first it looked like it was all bubbly and wrinkled when I saturated the paper. (I was so scared!) But after letting it dry thoroughly for 24 hours all the paper went back to flat and looked great. So don't stress like I did, just give it some time to dry and it should be ok.


I knew from the start I wanted to use the beige paper with the writing on it (Good Fortune) for the inside of the box. I cut the five pieces for the bottom and four internal sides tested that they all fit well before gluing it down.  For the inside of the lid I choose the dragon/text black and gold paper (Pearls of Wisdom.)  At this point I realized the lid would not close properly. The lid was so snug the thickness of the paper made it too tight. To fix this the edges of the lid were sanded carefully with a dremel tool.  After the adjustments were complete, I inked the exposed wood in a dark brown to match the original finish. I then proceeded to add the black pattern paper with the red circular pattern (Jasmine Dreams) to the outer sides of the box.


The top of the lid was covered with the 8x8 floral paper with the black background (Joy Luck.) To further decorate the sides of the box I fussy cut some of the birds and flowers from the  12x12 version of the floral paper and the page with tags on it (Tranquility). At this point I sealed the paper (including the fussy cuts) with decoupage.  After it dried I added the feet, which are round wood knobs about one and a quarter inches in diameter.  I dyed them with bround Chox and Tim Holtz distress stain in brass to try and give it a weathered, distressed look.


I decided to keep the sides simple and just added some Seven Gypsy metal photo corners in varying sizes to the upper corners. And small corner covers on the bottom corners.  For the top I started with a pair of vintage, enameled chopsticks and some bird printed ribbon.  I added a stamp from the matching G45 stamp set on the end of the ribbon in red On the front I added a pull to the lid with ribbon, a Prima embellishment of a bird and a jade colored bead.


Then I layered G45 Staples metal flowers with mother of pearl buttons and red beads. Also I put in some Recollections metal flowers and jade colored beads.  My final touch on the lid were some Asian coin shaped brads by Marah Johnson/Creative Imaginations.  I cut the pointy parts off as best I could and glued them at a slight angle.


I used the matching G45/Hampton Arts stamps with Color box chalk (Windsor blue) and G45 Decades inks (triumphant red, cashmere, photogenic) to stamp a cherry blossom filled fan and a twig of cherry blossoms. (I love the idea of the blank fan with the mix and match patterns.)  I added a small amount of yellow Stickles to the centers of the red cherry blossoms. I then fussy cut both stamped images out.  The fan was layered with one of the vintage painted ladies and two of the stickers from the Bird Song set. The fussy cut cherry blossoms were added to the top.  More metal flowers, mother of pearl buttons and beads were placed along the right side.  On the left I added another of the Asian coin brads. The last embellishment is my favorite, I tied dragon charm (from the DCWV booth at CHA) tied to a chipboard tag with a piece of maroon ribbon that I frayed.

This piece looks ah-maze-ing in our bedroom where it sits on a side table and holds the watch I gave my boyfriend and the necklace he bought me for Valentine's Day.


Materials used:

Papers: Graphic 45 Bird Song (12x12, 8x8, chipboard tags and stickers)
Inks/Glitters/Paints: Colorbox windsor blue chalk, Graphic 45 Decades Ink (triumphant red, cashmere, photogenic)
Other: Graphic 45 Staples metal flowers, Seven Gypsies metal corner covers and photo corners, Recollections metal roses, Marah Johnson/Creative Imaginations brads, Prima bird embellishment, DCWV dragon charm, ribbons, beads, vintage chopsticks

G45 Curtain Call - Interactive Mini Abum & Box

My Dad was a bit of a cowboy.  He was a stuntman and actor in his twenties who became a (brilliant) documentary filmmaker. A  man who likes jazz and a good martini. He has always been a kind and generous man and I love him.  I have wanted to make him a crafted gift for a while now.  But masculine scrapbooking gifts are hard to get right, plus I wanted him to experience why I love paper crafts.  And finally it hit me. Graphic 45 Curtain Call. It has movies, jazz and cowboys plus the sepia and black coloring would make for a masculine tone. My original idea was a mini album, but this grew to be a interactive album with a matching altered cigar box to hold it.


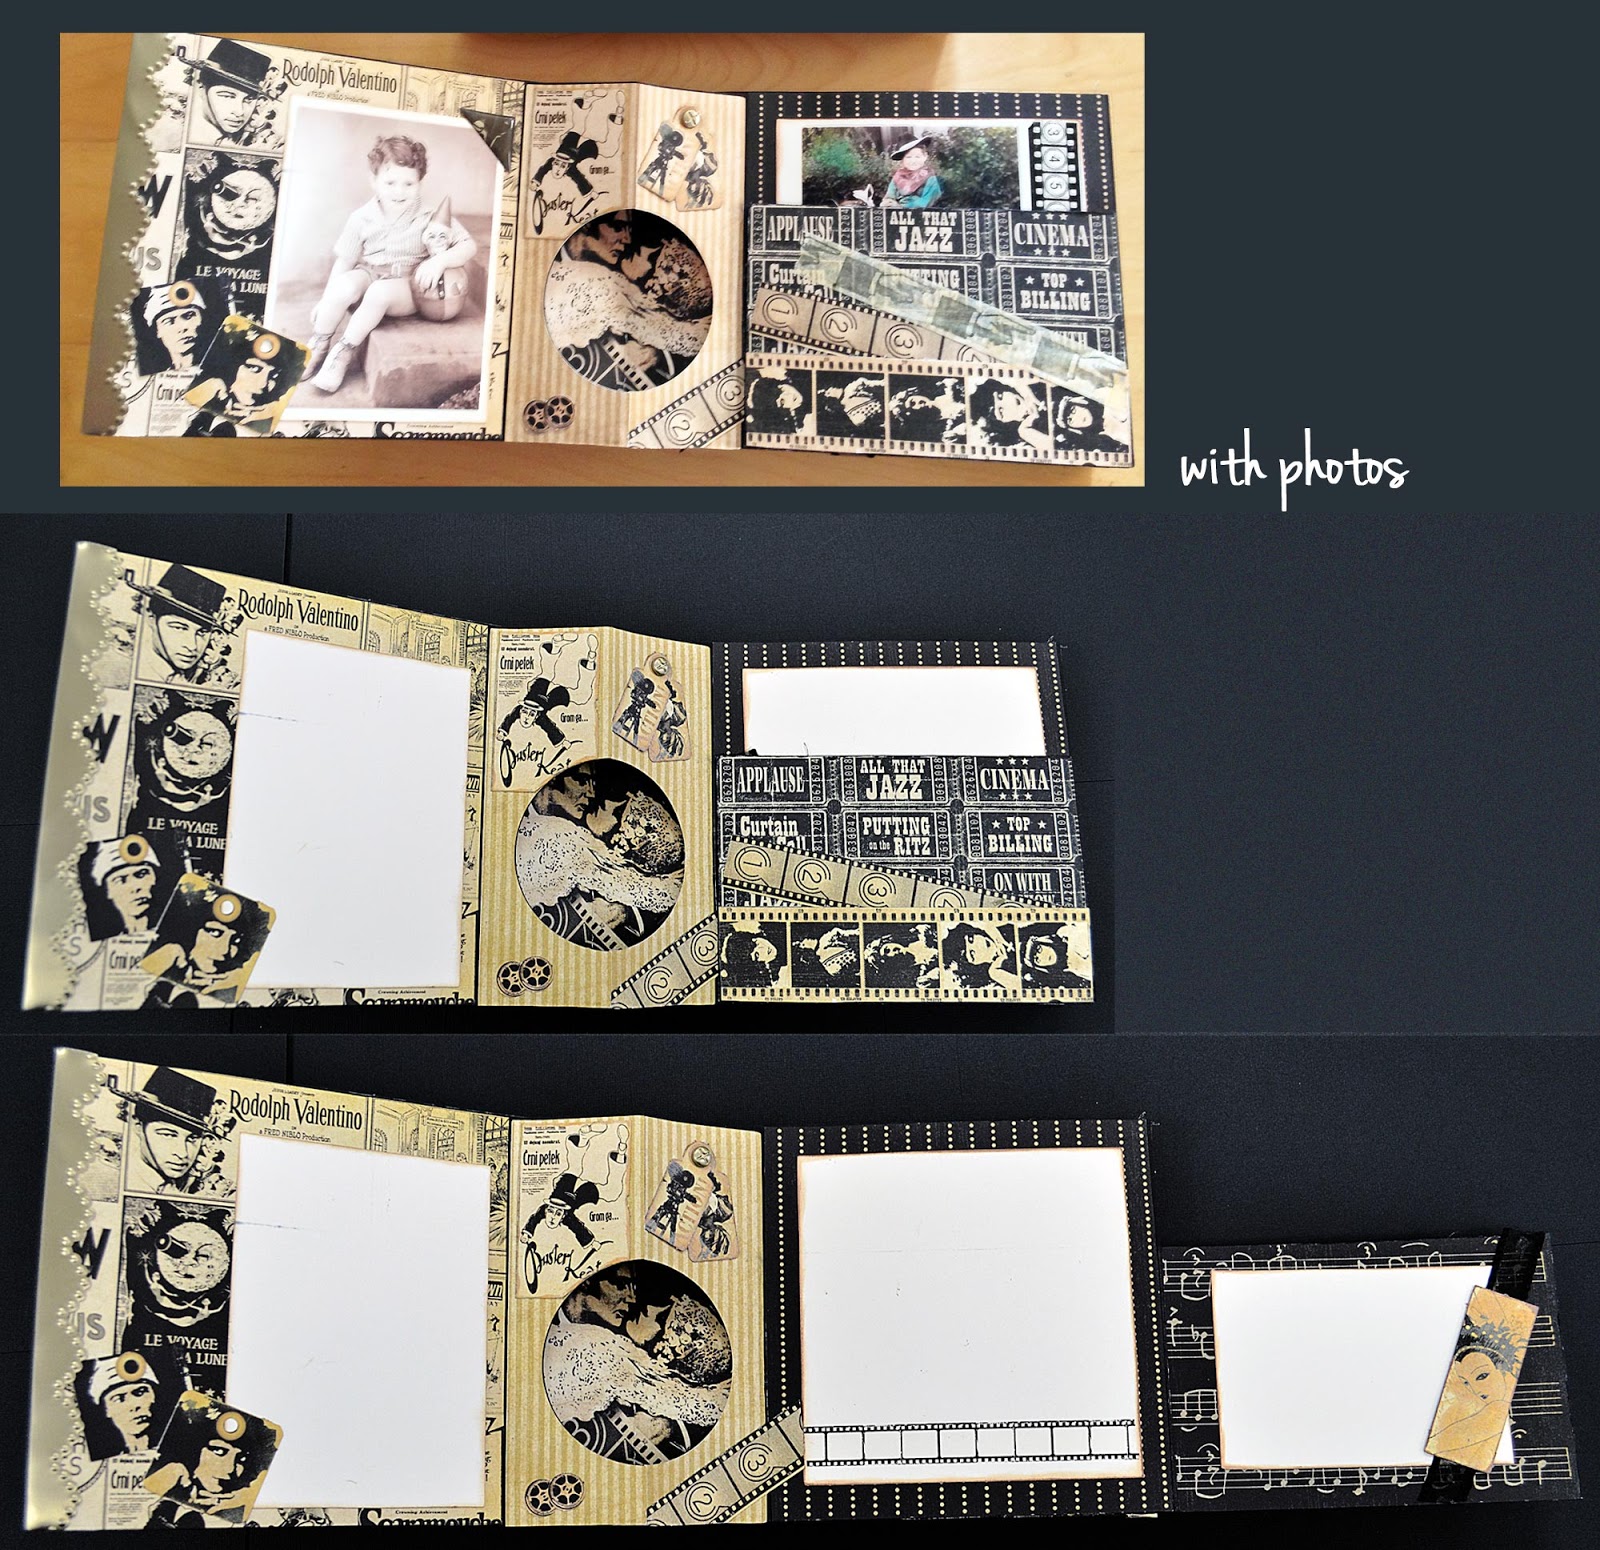
Because this is a gifted item, I am interspersing photos of the album with no photos and embellishments with (iphone) photos of the finished piece.  I hope they give a good idea of what it looks like and how all the flaps, tags and moving parts work. This may be my favorite piece I have made thus far and I really want to do it justice.

The box is an altered cigar box. I was not intending to use it as a container for a mini album, but when they fit together it was so perfect. How could I not? I used liquid glue and a sealer to attach the paper to the box. On the bottom edges and top I added the dotted pattern paper from G45's Curtain Call.  I also added an image of a cowboy, film and a camera cut from the same paper.

Using Tim Holtz Sizzix dies and my Big Shot, I cut two film strips in black and one ticket strip in a medium brown cardstock,  I then cut a metallic gold vellum so it was the width of the film frames and glued it between the two filmstrip pieces I had cut.  I also stamped the tickets with "Admit One." (I had thought this was the ticket from the G45 set that matched the paper, but it seems I was mistaken and am unsure what set this stamp is from, if anyone does, please let me know so I can post it.) I glued the film strip down to the top of the box in a wavy pattern.  the thickness of the paper made it fairly easy to manipulate and I curled the ends around a pencil.  The tickets were torn and glued down with a Jolene's Boutique gold pointed finger embellishment.  Around the edges, I added the words "Cowboy," "Filmmaker." "Actor," "Dad," and "Hero" in Dear Lizzie Thickers.  I also added a Tim Holtz crown, a Bo Bunny camera and a star in a circle charm as embellishments.
Inside the box, I lined the top with the ticket paper from Curtain Call and the bottom (not pictured) with the peacock paper and black and white dot paper.  I also added a strip of film printed ribbon to help lift the mini album out of the box.

The front cover features the cowboy/movie image I had also used on the top of the box.  I added a strip of film with images of starlets from the 8x8 pad and a semi circle cut with the can-can woman on the top edge. My Dad's name in the Dear Lizzie Thickers was placed about an inch an a half from the top, I tried to used the edge of the film as a guide to line the lettering up.  On the right side of the book is a Seven Gypsies metal edge decoration. On the inside corner, at the bottom is a decorative metal photo corner, also Seven Gypsies.  The spine/binding of the book is covered with MT washi tape in a striped pattern.  The base for this book is one and a half of the Pinecone Press interactive albums, I added several new flaps and pockets using some light weight chipboard. I will point out and explain the processes I used on these changes.
The first pages have a pop-up middle with a cut out circle frame that is part of the album. I added a flap to the right page that is slightly smaller than the page it folds on to.  To add the flap I cut a piece of chip board about and inch or two wider than I wanted the flap. Then I scored that chipboard at the actual size.  I glued the flap to the existing edge of the album making sure the new flap lined up well. After inking the album edges in black, I covered it in the movie poster paper, ticket paper, music paper and dotted line paper from Curtain Call that was cut to size.  I covered the center pop-up with two panels.  I used a two inch circle punch to match the cut out.  Behind the cut out I added the "The Kiss" image.  I decorated the rest of the center panel with with tags and images from the matching Curtain Call die cut sheet and a fussy cut image of Buster Keaton. Here and with the rest of the album I added some cream colored photo mats I chalked in creamy brown.  To these I added film washi tape and some black ribbon with a dramatic woman from the G45 paper.  After adding the photos to the album, I also added a metal photo corner and some additional paper tape, (Pointed finger tape by Seven Gypsies and film taper by Teresa Collins.)

 The third set of pages originally had two symmetrical flaps, one on each side. This seemed boring, so using chip board I added a second flap to the top of the left one and a two-thirds sized flap to the center of the right page that flips in the opposite direction of the existing flap. (To keep the pattern paper clean and tidy over a flap in the middle like this, cut a slit in the paper and slide the flap into it.)  I inked all the chip board in black and covered it with Curtain Call.  I think the piano keys look really nice on the back of the added flap.  Photo mats with inked edges were placed.

After adding photos, I added some embellishments.  A Bo Bunny camera and film clap board. Some chipboard photo corners and the CC man on the moon die cut. (I love this one, so cute!)  Some more film style washi tape was added to the edges of a couple photo mats.

 On this page I used the clock paper from Graphic 45's Kraft Reflections paper as the background, and the CC stamps on the front panel of the pockets.  I made tags for the pockets using my Cricut with the Artiste, Holiday Tags and More and Movie Night images.  The paper is an unknown ticket pattern kraft paper, the cream and yellow stripe CC and black cardstock.  I left the backs the cream photo mat color.  I added photos with decorative kraft paper shapes behind them.

Here on the fifth spread,  I added a small pocket wit a flap that holds a tag and a square flap that is attached just to the right of center.  To make the pocket with flap I scored the chipboard at about two-thirds of the width, this made the flap.  And when I attached the pocket I only put glue/tape on the edges of the left side, bottom and to left of the flap scoring (right edge of pocket.), so that the top was open.  When I covered up the flap I used a sheet of G45 Happy Haunting for the stripes.  I fussy cut the flapper and couple dancing to make a tag that fit in the pocket.  On the opposite side I attached a large flap about an inch from the center.  I placed the jazz image from the Curtain Call paper with the four quadrants, I really like this image and think it looks on its own without additional embellishments.
In the margin between the flap and center fold of book I placed the keyboard from the CC diecut sheet. And on the back is the jazz band, also from the die sheet. When you flip it over a fussy cut orchestra and another photo mat is revealed. Along with the photos I added some more of the Seven Gypsy photo corners and a Bo Bunny camera.
The sixth page is another that originally had the flaps on both sides.  I removed the flap on the left and added a small one to the center of the spread.   The left side has a picture mat that is almost full page that is on top of the music note paper. On the small flap, I used one of the larger die cuts (of an orchestra and trumpet player) and made it into a pocket by only gluing down the bottom and left side. Having removed the corner image I made a tag with the die cut records glued back to back in the corner.  On the back of the flap is the poster of Blood and Sand from CC along with a die cut tag.  The right side has an image of a couple dancing with a silhouette of a band behind them.  I fussy cut one side so the dancing couple was on top of the photo mat. When the photos were placed more washi tape in both film and camera patterns and metal photo corners were added.
The final spread of pages is also a pop up with the circular cut out.  This time I glued bakers twine between the film spool die cut from CC to a black cardstock circle with my grandfathers brand symbol on it (half circle p.)  I then glued the twine to the back of the fold so the film and brand hung in the cut out space and the tension in the twine makes it spin slightly.  On the left I have cut around the edge of the girl with the fan. And on the right I made another pocket/tab combination. I used the small ticket kraft paper over the Curtain Call ticket paper so that when the tag is removed you see them both against each other through the die cut star. (The star was used on one of the large tags on the second page.) To make the tag I used a black and white striped paper and added a can-can/moulin rouge woman I had fussy cut. The "handle" for the tag are tickets cut from the CC paper and ripped in half. On the center panel is a fussy cut of the who's who in Hollywood book.  With the photos I added a snapshot of love embellishment next to a picture of my Dad with his wife. (awwww) And with the photo attached the tag can go in backwards so the photo shows in die cut, depending on what looks good.

The back of the mini album features another collage of movie images with film.  Over this I added more film from Curtain Call and Tim Holtz' film tape.  I also added a stamped ticket and a fussy cut Charlie Chaplin.  The edge has a Seven Gypsies metal edge decoration to match the front.

I really love this album.  I think it ended up being the right balance of masculine and pretty. And that there is a matching box the album is stored in makes it seem so much more complete.  I also really loved the chance to go through all these old photos of my Dad to fill the album.

Materials used:
Cricut Cartridges: Artiste, Holiday Tags and More, Movie Night
Papers: Graphic 45 Curtain Call (12x12, 8x8 and die cuts), Happy Haunting and Kraft Reflections, Kraft paper with small tickets by ?, black, brown and cream colored cardstock, gold colored vellum.
Inks/Glitters/Paints: Colorbox creamy brown chalk, black Sharpie
Other: Bo Bunny film and camera 3d stickers, Seven Gypsies metal edge decorations and photo corners, Tim Holtz Sizzix dies (filmstrips and tickets), crown embellishment and film tape, "Admit One" cling stamp, film and camera washi tape (Teresa Collins, Seven Gypsies and MT, Jolene's Boutique gold hand, American Crafts Dear Lizzy Thickers (Lucky Charm)

Thank you for patience reading a long blog post, but I didnt want to leave anything out.
<3 Laurel

Wednesday, March 20, 2013

G45's A Ladies' Diary Birthday Card

This is a birthday card for my Stepmom.  I choose to use Graphic 45 A Ladies' Diary for two reasons.  First, it has all the colors my Stepmom likes-pale pinks, blues, peaches and creamy whites. And second, it is really beautiful paper with great graphic images of turn of the century and twenties fashionable ladies and pastel colored flowers.  I decided to make a card using a tabbed file folder look that some fun tabs and folds.  I started by making a base for the card in Cricut Craft Room. I used the welding feature to merge together the basic card rectangles with tag shaped to make the folder style tabs and the curved window cut out. 
I cut the base out on cream cardstock and chalked around the whole card with creamy brown. Because the final base is more than 12x 12 it is made of two pieces that I attached at the right side fold.  I did this by extending the paper past the (scored) fold and gluing the overhang to the the back of middle piece like a tab.  For the very front portion with the window I used the Cricut again, to cut the A Ladies' Diary paper to match. In some parts,  I also traced the base and hand cut to fit.
 Once I had the front panel of pattern paper cut, I attached a layer of iridescent blue gauze/tulle so it covered the window area.  I did this with with double sided tape that could multitask.  When I glued the pattern paper to the base it sandwiched the mesh securely between the two pieces of paper. After that I covered the entire card base with A Ladies' Diary pattern paper and began to decorate the card.
For the front, I choose one of the fashionably dressed ladies out of the 12x12 pad.  I really liked the image of this womanin silky blue, because she its on the card well and I can see my Stepmom in the dress. I fussy cut the image about 3/4 of the way around, leaving a portion of the left side near her purse with a staright edge.  I then glued her on top of a piece of vintage lace I had hand colored with Glimmer Mist (Sea Shells)and Fireworks (Pink).  I added some faux pearl halves to the lace and some German Glitter Liner (Holographic) to the centers of the flowers, the necklace, the purse and feathered headpiece on the paper.  I placed the lace and woman on the front so it overlapped the window and portions of the lace and image dangle off the base a little bit. I also added another fussy cut and glittered flower to the folder tab on the edge.
On the inside of the first flap I added a small cameo and some glitter on the tab on the edge.  I used an edge punch on some "wooden" paper to make a zigzag art deco-ish strip I attached along the side of the window (below the layer of A Ladies' Diary paper covering the base.) I then added some of the stamp images and a pink and metal embellishment with a strip of lace behind it.  On the page opposite I hand wrote my Stepmom's name and added some bling (Teresa Collins) to the folder tab at top. I then, fussy cut one some of the roses and added some Distress Glitter and pink rhinestones on the petals. When I attached the flowers I only glued along the left and bottom edge to make a pocket. Using two pieces of the patterned paper glued back to back, I added one of the images from A Ladies' Diary with a group of ladies with umbrellas to make a tag. 
I glued the two clock/button chipboard pieces back to back at the top of the card and then threaded a piece of ribbon through the holes. (If the chip board is too think try pealing a layer or two of the chipboard off the back before attaching. Just remember glue runners do not always like the "peeled" cardboard, but liquid glue works fine.)  On the back of the tag I added a birthday sentiment I printed on vellum with my ink jet printer along with a purple tinted faux pearl and some washi tape (Tim Holtz-Sketchbook) with a vintage writing look.
 
 The center panel folds down to reveal a pretty blue print with a squre of the handwritten text paper from the 8x8 pad of A Ladies' Diary.  On top of this it says Happy Birthday, which was printed on vellum with my ink jet. (the font is Black Adder)  I used Tombow's vellum tape to adhere it with out leaving tape marks. on the "folder" tab at the top I placed large and small faux pearls.  Across the page is more washi tape in both the writing and butterfly patterns of the Sketchbook collection. At the top right I adhered a small chip board tag of roses from A Ladies' Diary with a piece of grey-blue dotted ribbon tied through it.  There is also a Bo Bunny floral cameo embellishment across the washi tape.
The final tab/flap opens to the right and displays the card's "centerfold" of the umbrella holding cover girl of the A Ladies' Diary paper.  She was fussy cut and placed so that the feather in her hat over hung the card base at the top. Distress stickles in pink was added to her umbrella and gloves. There are some smaller stamps cut out and placed around her.  There is also a Prima white washed heart embellishment at the top of the page. Below her are a post card and fussy cut rose from the Diary paper. I added some glitter to the petals with the distress stickles.  I really like how the rose fills the tab at the bottom, i thnk it kind of hides the upside down back of the tab.
I also really like the subtle blends of pinks and yellow in the coloring. That is why I have been using the distress style glitter as opposed to regular glitter, I think the slight iridescent shine from the mica enhances the colors better than a sparkly flashy glitter would.
 On the last page there is a small scallop-edged envelope cut with the Cricut on the rose and clock paper from the 8x8 pad. It is matted on some of the blue striped pattern paper.  The edged of the envelope are curled back and both inked in brown and lined on the edge with champagne colored German Glitter Liner from Splash of Color (Viva Decor). There is also a grey cameo on the envelope.  Inside the envelope in another tag. it has the blue-grey polka dot ribbon at  the top. I made the tag by gluing two pieces of the pattern paper back back and adding an image of the beautiful ladies to one side.  On the other side I added a piece of vellum, it is blank so I can write something and sign the card.

I really enjoyed making this card and am thrilled with how vintage it looks.  I hope my stepmom loves it as much as I do.

Materials used:
Cricut Cartridges: Artiste, Holiday Tags and More, Craftroom Basics
Papers: Graphic 45 A Ladies' Diary (12x12, 8x8 & chipboard tags), cream colored cardstock , thin vellum, wood paper
Inks/Glitter/Paints: Colorbox chalks (Creamy brown & Chestnut roan), Ranger Stickles (Distress pink), Splash of Color (Viva Decor) German Glitter Liner (Hologram & Champagne), Tattered Angels Glimmer mist (crushed shells & wisteria?), Tsukineko Fireworks (angel pink)
Other: Teresa Collins bling, Prima heart embellishment, Tim Holtz Washi tape (Sketchbook), Bo Bunny embellishments, Fab Scraps embellishments, ribbon, vintage lace, blue tulle, pink rhinestones and faux pearls

Monday, March 18, 2013

snips n scraps of me gets a face lift

I have been wanting to personalize the look of my blog for a while.  Now I finally have with images of my great grandma's fashion scrapbooks and a new header and color scheme.  I hope you like it.

Saturday, March 9, 2013

A little something...


Started working on an altered Altoids tin and mini book withe the G45 OZ paper while I was at Perfect Day.  Aren't these Valentine's day tins adorable?  I just used the cardboard insert as a template to make the heart shapes; so simple to do.  (I went back to 7-11 and bought two more, I was so excited to alter them.)